Stitch and Glue Construction ..................................................................................................................................
These step by step videos show the stitch-and-glue kayak construction process. All of our boat kits are built using this "stitch-n-glue" construction. The panel shapes differ, but the stitch and glue steps are nearly identical.
To see the entire list of stitch-n-glue videos scroll to the bottom of this page. The photo sequence to the right shows the construction of Pygmy's Osprey Triple kayak kit (featured in Wooden Boat Magazine, Vol. 131 & 132, 1996), which also uses stitch and glue in its assembly. ...............................................................................
Simple Construction: Stitch and Glue
Never before have boats of this complexity been so simply and quickly built. The building process takes no special skills. Hundreds of women and men with no prior woodworking experience build Pygmy boats each year. No power tools are needed. They require no strong back or mold. No trimming of panels. Our shop crew does all the woodworking.
Delivery: The boat kit arrives via FedEx to your door in two boxes (If you are building the Wineglass Wherry, you will also receive a third box). The wood panels will arrive to you in a 8' x 13.5" x 3.5" box. The building supplies come in a separate box (ranging from 12"x12"x12" to 20"x15"x13", depending on which boat you are building). Unpack the boxes, lay out the labelled panels, and glue them to their full lengths. Edge drill the wiring holes with a handy little template that makes this step a snap.
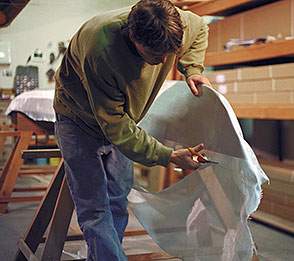
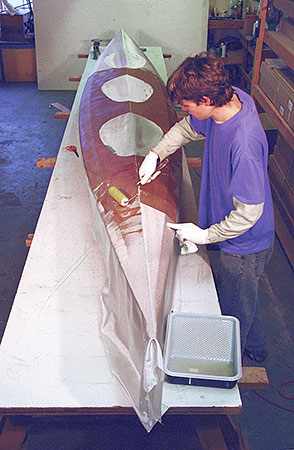
Stitch and Glue: Start sewing the panels together with small wire twists. You exert no force on the panels. They easily assume their proper shape as you stitch them together. Next, glue the seams, remove the wires the following day, and fiberglass the boat. We recommend mixing epoxy, pouring it in a paint tray and laying it on with a foam roller. This technique quickly saturates the fiberglass cloth, laminating it to your hull.
Building Space: Most people build their Pygmy in a garage or basement. Those without an outbuilding or basement can clear the living room furniture, spread out a tarp and construct a boat right in the house! Apartment dwellers most commonly choose this option. Just make sure the finished boat will slide through a door or window. In warm weather, you can erect a tarp to keep off moisture, and build outdoors.
What Comes In A Kit
We use only the highest grade of BS-1088 marine Okoume plywood.
Each kit contains precision pre-cut panels and cockpit coamings, a fully illustrated manual, 2-part slung back seat, Keepers adjustable footbraces, 1 1/2 to 3 gallons of epoxy (depending on which kit), all the fiberglass tape, all fiberglass cloth, syringes, squeegee, epoxy pumps, wood flour, wire, temporary frames, push pins, vinyl gloves, and mixing sticks (see also "Frequently Asked Questions").
Comprehensive Manuals & Phone Support
Our manuals contain computer CAD illustrations to walk you through every step of the stitch and glue construction process. Many builders have called and written to compliment our manuals as the best they have ever used. We offer our kit builders phone consultation for any questions they might have and our time to assist you comes with the kit. We encourage phone calls.
Finishing Your Hull
Once you've completed your Pygmy, you can use it 2 to 4 weeks before varnishing or painting. This allows the epoxy to go completely hard. Dry out the boat and sand by hand or with a random orbital sander. Most people choose to bright finish their boats. The Okoume's lovely, warm honey tones go even a bit darker and richer with the application of a top quality spar varnish. We recommend Z-Spar's "Flagship" or System Three's Spar Urethane Varinsh. It's durable and has excellent UV protection. The finish will last 2 to 7 years depending on intensity of use and climate and storage.
Painting is the other finishing option. It requires more care in the sanding stage. Paint tends to highlight any unevenness in the sanded surface, the edges of glass tape (we recommend feather sanding tape edges for a smooth transition), or drip lines of epoxy. If you work cleanly while building your boat, wiping up drips or sags while they're still wet, etc., you'll save sanding time at the end. To paint, use tough epoxy paints or 2-part polyurethanes (extremely toxic, but extremely tough). Other paints do not hold up well under the abrasion of beach landings.
Rugged & Ultra-Light
Wood-core, fiberglass composites give you the high tensile strength of fiberglass on the surfaces and the high compression strength of wood in the center. They are much stronger and stiffer than fiberglass or wood alone. This enables us to build boats much lighter than a similar hull can be built out of fiberglass or plastic. This superior strength allows a wood-core-glass boat to be about 30% lighter than fiberglass and up to 40% lighter than plastic. Strength and elegance--you get the best of both worlds with Pygmy composites.
Construction Time
The time necessary to build each Pygmy kit varies, but on average our kits take aproximately 80-100 hours to construct. With curing times, our kits can be assembled in a 6-8 week period.
Concerning Epoxy
Pygmy ships System Three Epoxy. We chose this particular epoxy after thorough testing of several different brands. When working with epoxy, mix it in small amounts, never more than 6 oz. at a time. Mixing in smaller amounts saves you from having to throw away too much hardened epoxy. Epoxy generates heat as it cures. If you mix 10oz. of epoxy and leave it in a measuring cup for 10 minutes it will generate so much heat that it will start to boil. Proper mixture of epoxy is two parts resin to one part hardener. We provide handy measuring pumps for that purpose.
If you are working during the winter in a garage or basement that is unheated, it is a good idea to bring in a space heater and try to get the temperature to at least 55 degrees F. (65 to 70 degrees is optimal). If the epoxy is cold, (below 70 degrees) it will be thick and hard to spread. If you are working below 70 degrees, you should keep your epoxy bottles in a warm place.
Finally, remember that epoxy adds strength to your boat only when embedded in fiberglass cloth. A thick layer of epoxy floating on top of the fiberglass only adds weight to your boat, not strength. Work carefully and refer to our manual and The Epoxy Book (included in your kit), and working with epoxy will be safe and easy.
Step-by-Step Construction Videos
Click the title below to watch the video. A new window will open up with the video shown in YouTube:
12 Hours Wire the keel. Place the temporary frames
in position. Wire on panels, one at a time,
working from the bottom up. Watch video of wiring the keel